Fireshock20 (talk | contribs) m (Grammar) Tag: Visual edit |
Blockingcombos (talk | contribs) mNo edit summary |
||
| Line 102: | Line 102: | ||
*{{Color|bandit|Burst}} does not pair well with items like {{ItemLink|Shatterspleen}} and {{ItemLink|Tri-Tip Dagger|alt= Tri-Tip Daggers}} because the stacks wear off during the reload animation. |
*{{Color|bandit|Burst}} does not pair well with items like {{ItemLink|Shatterspleen}} and {{ItemLink|Tri-Tip Dagger|alt= Tri-Tip Daggers}} because the stacks wear off during the reload animation. |
||
* Rapid-firing {{Color|bandit|Blast}} drastically increases the spread of the rifle. Pacing shots is necessary for hitting targets at long range. |
* Rapid-firing {{Color|bandit|Blast}} drastically increases the spread of the rifle. Pacing shots is necessary for hitting targets at long range. |
||
| − | * Both {{Color|bandit|Serrated Dagger}} and {{Color|bandit|Serrated Shiv}} reset Bandit's aerial momentum, which can be used to prevent fall damage. |
+ | * Both {{Color|bandit|Serrated Dagger}} and {{Color|bandit|Serrated Shiv}} reset {{Color|bandit|Bandit's}} aerial momentum, which can be used to prevent fall damage. |
| − | * Use {{Color|bandit|Smoke Bomb}} to get the most use out of Bandit's {{Color|bandit|Backstab}} passive, allowing you to reposition behind enemies while they're distracted. |
+ | * Use {{Color|bandit|Smoke Bomb}} to get the most use out of {{Color|bandit|Bandit's}} {{Color|bandit|Backstab}} passive, allowing you to reposition behind enemies while they're distracted. |
| − | * Since {{Color|bandit|Smoke Bomb}} moves Bandit upward while in the air, it can effectively be used as an extra jump to increase your mobility or to prevent fall damage. |
+ | * Since {{Color|bandit|Smoke Bomb}} moves {{Color|bandit|Bandit}} upward while in the air, it can effectively be used as an extra jump to increase your mobility or to prevent fall damage. |
| − | * Using any Bandit ability while airborne and under the effect of {{Color|bandit|Smoke Bomb}} will make him instantly exit invisibility and perform a mid-air jump from {{Color|bandit|Smoke Bomb}} ending. |
+ | * Using any {{Color|bandit|Bandit}} ability while airborne and under the effect of {{Color|bandit|Smoke Bomb}} will make him instantly exit invisibility and perform a mid-air jump from {{Color|bandit|Smoke Bomb}} ending. |
*While {{Color|bandit|Desperado}} has the potential for higher damage, tokens resetting after each stage makes it difficult to be useful in later stages. {{Color|bandit|Lights Out}}'s ability to reset cooldowns is much more reliable. |
*While {{Color|bandit|Desperado}} has the potential for higher damage, tokens resetting after each stage makes it difficult to be useful in later stages. {{Color|bandit|Lights Out}}'s ability to reset cooldowns is much more reliable. |
||
Revision as of 12:01, 20 April 2021
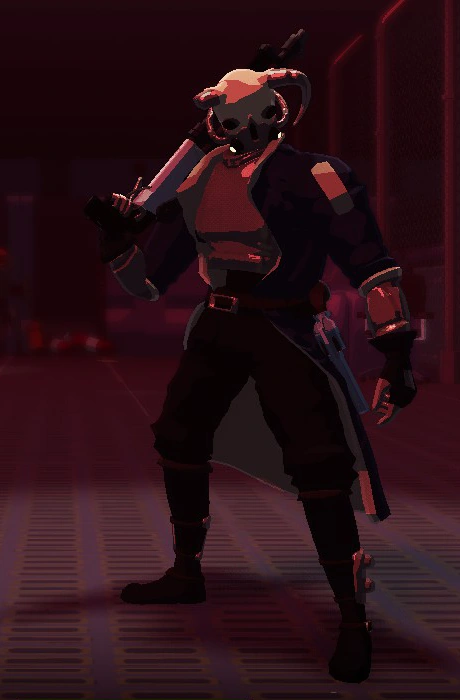
| Bandit | |
|---|---|

| |
| The Bandit is a high-skill combo character that can dish out devastating backstabs while weaving in and out of stealth. | |
| Health | 110 (+33 per level) |
| Health Regen | 1/s (+0.2 per level) |
| Damage | 12 (+2.8 per level) |
| Speed | 7 m/s |
| Armor | 0 |
| Unlock | Warrior |
| Umbra Title | |
| Desperate Outlaw | |
| Ending Phrase | |
| Escaped : ..and so he left, grateful for his luck.
Vanished : ..and so he vanished, full of regret. | |
Bandit is a playable character in Risk of Rain 2.
Skills
Passive
Backstab | ||
|---|---|---|
 | ||
| Type | Passive | |
| Description | All attacks from behind are Critical Strikes. | |
Primary
Burst | ||
|---|---|---|
 | ||
| Type | Primary | |
| Cooldown | 0.5s/shot | |
| Proc Coefficient | 0.5 (x5) | |
| Description | Fire a shotgun burst for 5x100% damage. Can hold up to 4 shells. | |
Blast | ||
|---|---|---|
 | ||
| Type | Primary | |
| Cooldown | 0.5s/shot | |
| Proc Coefficient | 1.0 | |
| Description | Fire a rifle blast for 330% damage. Can hold up to 4 bullets. | |
| Notes | ||
| ||
Secondary
Serrated Dagger | ||
|---|---|---|
 | ||
| Type | Secondary | |
| Cooldown | 4s | |
| Proc Coefficient | 1.0 | |
| Description | Lunge and slash for 360% damage. Critical Strikes also cause hemorrhaging [ Hemorrhage ] Deal 2000% base damage over 15s. Hemorrhage can stack. | |
| Notes | ||
| ||
Serrated Shiv | ||
|---|---|---|
 | ||
| Type | Secondary | |
| Cooldown | 4s | |
| Proc Coefficient | 1.0 | |
| Description | Throw a hidden blade for 240% damage. Critical Strikes also cause hemorrhaging [ Hemorrhage ] Deal 2000% base damage over 15s. Hemorrhage can stack. | |
| Notes | ||
| ||
Utility
Smoke Bomb | ||
|---|---|---|
 | ||
| Type | Utility | |
| Cooldown | 6s | |
| Proc Coefficient | 1.0 | |
| Description | Stunning [ Stunning ] Interrupts enemies and briefly stuns them. | |
| Notes | ||
| ||
Special
Lights Out | ||
|---|---|---|
 | ||
| Type | Special | |
| Cooldown | 4s | |
| Proc Coefficient | 1.0 | |
| Description | Slayer [ Slayer ] The skill deals 2% more damage per 1% of health the target has lost, up to 3x damage. | |
Desperado | ||
|---|---|---|
 | ||
| Type | Special | |
| Cooldown | 4s | |
| Proc Coefficient | 1.0 | |
| Description | Slayer [ Slayer ] The skill deals 2% more damage per 1% of health the target has lost, up to 3x damage. | |
| Notes | ||
| ||
Tips
- Burst and Blast can be shot as fast as one can click/press the corresponding button. Items increasing attack speed like
 Soldier's SyringeSoldier's Syringe
Increase attack speed.
Increases attack speed by 15% (+15% per stack). only speed up the reload animation of the gun. - You will start reloading quicker if your gun is empty rather than if there are bullets remaining in the chamber.
- Burst does not pair well with items like ShatterspleenShatterspleen
Critical strikes always bleed enemies. Bleeding enemies now explode.
Gain 5% critical chance. Critical Strikes bleed enemies for 240% base damage. Bleeding enemies explode on death for 400% (+400% per stack) damage, plus an additional 15% (+15% per stack) of their maximum health. and Tri-Tip DaggerTri-Tip Dagger
Gain +10% chance to bleed enemies on hit.
10% (+10% per stack) chance to bleed an enemy for 240% base damage. because the stacks wear off during the reload animation. - Rapid-firing Blast drastically increases the spread of the rifle. Pacing shots is necessary for hitting targets at long range.
- Both Serrated Dagger and Serrated Shiv reset Bandit's aerial momentum, which can be used to prevent fall damage.
- Use Smoke Bomb to get the most use out of Bandit's Backstab passive, allowing you to reposition behind enemies while they're distracted.
- Since Smoke Bomb moves Bandit upward while in the air, it can effectively be used as an extra jump to increase your mobility or to prevent fall damage.
- Using any Bandit ability while airborne and under the effect of Smoke Bomb will make him instantly exit invisibility and perform a mid-air jump from Smoke Bomb ending.
- While Desperado has the potential for higher damage, tokens resetting after each stage makes it difficult to be useful in later stages. Lights Out's ability to reset cooldowns is much more reliable.
Lore
A few drinks here, a few laughs there. A few more drinks. A sleight of hand – and bang, keycard access to the loading bay of the Safe Travels. The camo suit can handle the rest.

A secret mission means low profile – and low security. Besides, everyone is wearing environment suits before we leave orbit. How would they know?

I mean, it’s the goddamn Contact Light. Think of how much those higher security chests could flip for! And some of the militech on that ship? Howdy hey. That’s probably what some of the other boys were thinking, sneaking onto that ship in the first place.

My coat?

I’m a thief - not a plumber. Of course I’m bringing my coat.
Gallery
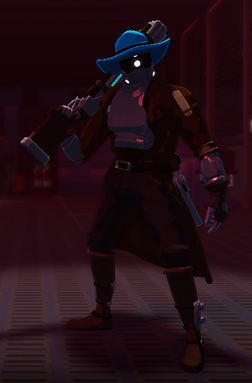
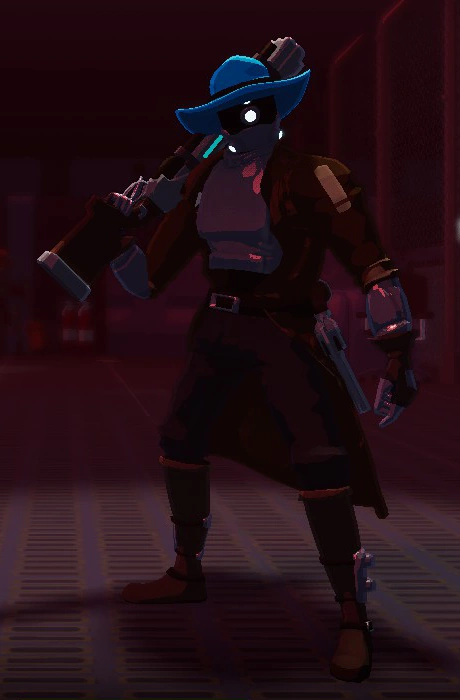
 Default
 Chilly
Trivia
- Bandit's "Chilly" skin is a reference to Ibzan - the main antagonist of Hopoo's other game, DEADBOLT. The skin bears a close resemblance to him, the name refers to the constant cold that skeletons feel, the shotgun model is replaced with a Semi-Auto Shotgun and the knives are replaced with kitchen knives.
- Before the Anniversary update, Bandit was in the game's files as an unused survivor. Notably he was the most complete unused survivor.
- Bandit's Burst primary ability has no rate of fire cap, and is only limited by the 4-shot cooldown.
| Risk of Rain 2 Wiki |
|---|
| Main |
| Artifacts • Challenges • Chests • Difficulty • Drones • Equipment • Interactables • Items • Item Stacking • Lore • Mechanics • Monsters • Newt Altars • Prismatic Trial • Shrines • Status Effects |
| Survivors |
 AcridAcrid is a melee-range hybrid who uses powerful poisons to melt tanky enemies. AcridAcrid is a melee-range hybrid who uses powerful poisons to melt tanky enemies.Class: Melee / Ranged HP: 160 (+48 per level) Damage: 15 (+3 per level) Armor: 20 Umbra: Test Subject •  ArtificerThe Artificer is a high burst damage survivor who excels in fighting large groups and bosses alike. ArtificerThe Artificer is a high burst damage survivor who excels in fighting large groups and bosses alike.Class: Ranged HP: 110 (+33 per level) Damage: 12 (+2.4 per level) Armor: 0 Umbra: Herald of the House Beyond • BanditThe Bandit is a high-skill combo character that can dish out devastating backstabs while weaving in and out of stealth.Class: Ranged HP: 110 (+33 per level) Damage: 12 (+2.4 per level) Armor: 0 Umbra: Desperate Outlaw •  CaptainThe Captain is a unique survivor that can control the battlefield with utility and damage - with help from the UES Safe Travels. CaptainThe Captain is a unique survivor that can control the battlefield with utility and damage - with help from the UES Safe Travels.Class: Ranged HP: 110 (+33 per level) Damage: 12 (+2.4 per level) Armor: 0 Umbra: Tired Veteran •  CommandoThe Commando is a jack-of-all-trades character that is reliable in all situations of the game. CommandoThe Commando is a jack-of-all-trades character that is reliable in all situations of the game.Class: Ranged HP: 110 (+33 per level) Damage: 12 (+2.4 per level) Armor: 0 Umbra: Cornered Gunslinger •  EngineerThe Engineer is a unique class that requires planning and positioning to be successful. EngineerThe Engineer is a unique class that requires planning and positioning to be successful.Class: Ranged HP: 130 (+39 per level) Damage: 14 (+2.8 per level) Armor: 0 Umbra: Fortification Expert •  HereticThe Heretic is a powerful character who can only be accessed through extraordinary means. HereticThe Heretic is a powerful character who can only be accessed through extraordinary means.Class: Ranged HP: 440 (+132 per level) Damage: 18 (+3.6 per level) Armor: 0 Umbra: Unorthodoxy Risen •  HuntressThe Huntress is an extremely mobile but fragile survivor with a high damage output. HuntressThe Huntress is an extremely mobile but fragile survivor with a high damage output.Class: Ranged HP: 90 (+27 per level) Damage: 12 (+2.4 per level) Armor: 0 Umbra: Judge, Jury, Executioner •  LoaderThe Loader is a slow but powerful bruiser that can use her grappling hook to uniquely navigate the environment. LoaderThe Loader is a slow but powerful bruiser that can use her grappling hook to uniquely navigate the environment.Class: Melee HP: 160 (+48 per level) Damage: 12 (+2.4 per level) Armor: 20 Umbra: Bionic Powerhouse •  MercenaryThe Mercenary is a high skill melee survivor that uses his many dodges to weave in and out of combat. MercenaryThe Mercenary is a high skill melee survivor that uses his many dodges to weave in and out of combat.Class: Melee HP: 110 (+33 per level) Damage: 12 (+2.4 per level) Armor: 20 Umbra: Hired Blade •  MUL-TMUL-T is an aggressive survivor who has the tools necessary for any job! MUL-TMUL-T is an aggressive survivor who has the tools necessary for any job!Class: Melee / Ranged HP: 200 (+60 per level) Damage: 11 (+2.2 per level) Armor: 12 Umbra: Right Tool for the Wrong Job • Railgunner is part of the Survivors of the Void DLC. It is only available if the DLC is enabled when starting a run. Click for more info.  This content is part of the Survivors of the Void DLC. It is only available if the DLC is enabled when starting a run. Click for more info.RailgunnerThe Railgunner is a long-range, single target survivor that can instantly kill any high priority target - and from any range. Class: Ranged HP: 110 (+33 per level) Damage: 12 (+2.4 per level) Armor: 0 Umbra: Forgotten Nomad •  REXREX is a half robot / half plant that uses HP to cast devastating skills from a distance. The plant nor the robot could survive this planet alone – but thankfully they have each other. REXREX is a half robot / half plant that uses HP to cast devastating skills from a distance. The plant nor the robot could survive this planet alone – but thankfully they have each other.Class: Ranged HP: 130 (+39 per level) Damage: 12 (+2.4 per level) Armor: 20 Umbra: Symbiotes • Void Fiend is part of the Survivors of the Void DLC. It is only available if the DLC is enabled when starting a run. Click for more info.  This content is part of the Survivors of the Void DLC. It is only available if the DLC is enabled when starting a run. Click for more info.Void FiendThe Void Fiend is a corrupted survivor that fluctuates between a controlled and corrupted form, each with different strengths and weaknesses. Managing this curse has become its fate. Class: Ranged HP: 110 (+33 per level) Damage: 12 (+2.4 per level) Armor: 0 Umbra: Corrupted Amnesiac |
| Environments |
| Abandoned Aqueduct Origin of Tar You dream of sand beneath your feet. Massive skeletons and pools of tar are littered around, and a towering aqueduct pouring down tar dominates the area. • Abyssal Depths Tectonic Relics You dream of fire. A hellfire-forged zone of blazing heat, the Abyssal Depths are believed to be a continuation and adaptation of the Magma Barracks from Risk of Rain. • Aphelian Sanctuary is part of the Survivors of the Void DLC. It is only available if the DLC is enabled when starting a run. Click for more info. Aphelian Sanctuary This content is part of the Survivors of the Void DLC. It is only available if the DLC is enabled when starting a run. Click for more info.Aphelian Sanctuary (Stage 2) Cleansing Center You dream of clarity. • Commencement Moon of Petrichor V You dream of glass and dirt. Large domain located above the shattered breach of  Mithrix MithrixKing of NothingHP: 1000 (+300 per level) Damage: 16 (+3.2 per level) Class: Melee / Ranged Speed: 15 m/s Armor: 20 and Providence's tools of creation. • Distant Roost Ground Zero You dream of waves, crashing on cliffsides. Spires of earth jut through the fog and unknown avian creatures circle far peaks guarding their broods. • Rallypoint Delta 'Contact Light' Survivor Camp You dream of quiet snowfall. Rallypoint Delta is the remains of a makeshift camp constructed by a group of scattered crew members from the UES Contact Light, somewhere in the frigid tundra of Petrichor V. • Scorched Acres Wisp Installation You dream of wind, blowing through trees. Large, circular platforms make up the majority of the stage, and embers float through the air. • Siphoned Forest is part of the Survivors of the Void DLC. It is only available if the DLC is enabled when starting a run. Click for more info. Siphoned Forest This content is part of the Survivors of the Void DLC. It is only available if the DLC is enabled when starting a run. Click for more info.Siphoned Forest (Stage 1) Ground Zero You dream of fire and ice. The map is blanketed in a layer of snow, with large trees surrounded by platforms spanning multiple levels. • Siren's Call Ship Graveyard You dream of wind. • Sky Meadow Sprite Fields You dream of serenity. • Sulfur Pools is part of the Survivors of the Void DLC. It is only available if the DLC is enabled when starting a run. Click for more info. Sulfur Pools This content is part of the Survivors of the Void DLC. It is only available if the DLC is enabled when starting a run. Click for more info.Sulfur Pools (Stage 3) Pungent Spring You dream of brimstone. Tiered lakes of shallow sulfur pools. Arcing bridges and underground caves connect the map together. • Sundered Grove Dormant Locus You dream of violent growth. Ancient flora has risen up to reclaim this once sacred refuge. Mazes of roots and overgrown fungus have twisted the landscape, leaving only ruins. • Titanic Plains Ground Zero You dream of rolling hills. Gigantic stone arches bracket the skyline, while the main play-field overlooks a vast fractured tectonic lowland. • Wetland Aspect Rehabilitation Zone You dream of twisting roots. Full of ruined stone structures and swampy areas filled with water. |
| Hidden Realms |
| A Moment, Fractured Hidden Realm: A Moment, Fractured Multiple floating islands in a void, with sharp blue crystals embedded in them. The Obelisk can be found on top of the last island. • A Moment, Whole Hidden Realm: A Moment, Whole A bleak and desolate realm. The refuge of the MithrixKing of NothingHP: 1000 (+300 per level) Damage: 16 (+3.2 per level) Class: Melee / Ranged Speed: 15 m/s Armor: 20 vengeance and destruction. • Bazaar Between Time Hidden Realm: Bazaar Between Time This stage serves as the shop in Risk of Rain 2. Players can purchase various Items with Lunar Coins or exchange items for higher-rarity ones in two crucibles. • Bulwark's Ambry Hidden Realm: Bulwark's Ambry The area consists of block-shaped platforms, with the Artifact Reliquary in the center. • Gilded Coast Hidden Realm: Gilded Coast You dream of wealth. This area is where the player fights the boss Aurelionite, the Titanic Goldweaver. • The Planetarium is part of the Survivors of the Void DLC. It is only available if the DLC is enabled when starting a run. Click for more info. The Planetarium This content is part of the Survivors of the Void DLC. It is only available if the DLC is enabled when starting a run. Click for more info.The Planetarium (Final) Cell V The Planetarium is an area somewhere within the Void, housing a collection of planets detained by the Void's denizens. It is inhabited primarily by the Voidling, the guard of the Planetarium or potentially the controller of the Void itself. • Void Fields Cosmic Prison Hidden Realm accessible only through the Bazaar Between Time. Until the cell is stabilized, the Void Fields will constantly "suffocate" the player for a small percentage of their current health. • Void Locus is part of the Survivors of the Void DLC. It is only available if the DLC is enabled when starting a run. Click for more info. Void Locus This content is part of the Survivors of the Void DLC. It is only available if the DLC is enabled when starting a run. Click for more info.Void Locus (Hidden Realm) Cell IIIVIIIIIILVIIIVLVILIVLLLVVVILIVLI You dream of potential. The Void Locus contains many Void Potentials and Cradles in place of chests, and is inhabited by Void monsters. |
| Expansions |
This content is part of the Survivors of the Void DLC. It is only available if the DLC is enabled when starting a run. Click for more info.Survivors of the Void |
| Alternate Game Modes |
| Eclipse • Prismatic Trials • This content is part of the Survivors of the Void DLC. It is only available if the DLC is enabled when starting a run. Click for more info.Simulacrum |
| Mechanics |
| Armor • Damage • Directors • Enemy AI • Family Events • Gold • Health • Item Stacking • Lunar Coins • Movement Speed • Proc Coefficient • This content is part of the Survivors of the Void DLC. It is only available if the DLC is enabled when starting a run. Click for more info.Void Fog |
| Other |
| Developer Console • Development Team • Languages • Modding • Soundtrack • Unreleased Items • Version History |